Showing posts with label Leg. Show all posts

Sunday, April 4, 2021

Leg Mounting


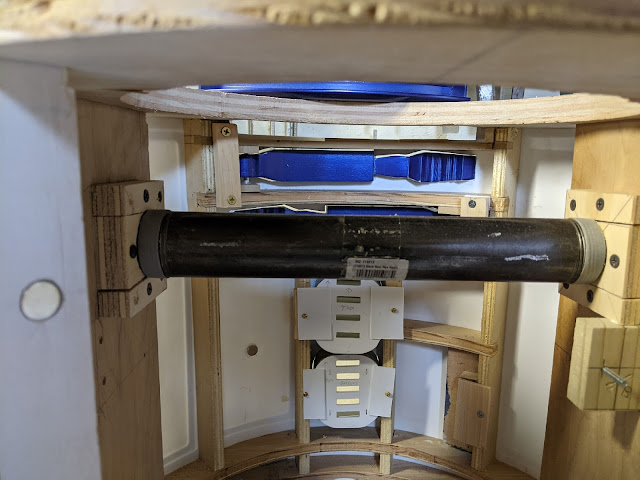
Here is a look at how I mounted the legs to the frame., Each leg has a piece of threaded iron pipe screwed into the shoulder flange. I used a piece of pre-threaded pipe and just cut it in half.


The two smaller pipes attached to the legs then go into a larger piece of pipe.


To hold that larger pipe in place I added blocks on the inside of the frame. I also wrapped some tape around the pipe to keep it centered and not slide out.


To make the blocks I started with a square piece of plywood and then drilled a hole the same size as the pipe.


I then cut out one side of each piece on the band saw to provide a way to get the pipe in. In hindsight I realized I only really need to to this on side, there was enough room to get the pipe in on one side without the cut out.


I glued the main piece onto the frame and the screwed the smaller piece into place when the pipe was installed. To keep the legs in the correct orientation I drilled a hole through the frame and into the shoulder hub and then inserted a pin to hold the leg at the correct angle.

Saturday, March 13, 2021

Leg Details


There are a few miscellaneous leg details that I haven’t covered yet. The foot is bolted to the leg through this hole on the bottom of the leg. To prevent the bolt from rubbing on the wood I used a copper pipe fitting. I cut it to length and glued it into the hole with epoxy.


The legs have a small groove around them. I cut the groove on the large faces with the table saw before I completely assembled the leg.


Since the side of the leg is skinned with styrene I simply cut the groove into the styrene instead of cutting into the wood.


The inside of the shoulder pockets is lined with styrene which I glued in with epoxy.


The top of the leg strut has a little cover that goes over it which I made from some 1/4 MDF.


Sunday, June 9, 2019

Center Leg

The center leg is one of those parts that I didn’t get a lot of progress pictures of, but it’s built just like the side legs.

The leg is made from three layers of plywood. I started with a paper template and used that to cut the outer two layers.


The center layer is just like the ankle on the outer legs. Once three layers were assembled I skinned the sides in styrene just like the outer legs. 


Saturday, March 2, 2019

Under Shoulder Detail Part 3

In my last two posts I showed how I made the cylindrical parts of the under shoulder details. Not it’s time to build the final assembly. I started by cutting pieces of dowel to make the side parts of the detail.

DSC02419

Between there there needs to be another dowel to hold the smaller cylinder. To drill the hole for this I made a jig. I drilled a hole through a block the same size as the side dowels. I then drilled a hole in the top of the block into the other hole, this is where the drill will go. Finally I tacked in a scrap piece of dowel into the hole so that when the dowel I am drilling is fully inserted the hole if the top is in the exact location I need the hole in the part.

DSC02420

The jig made it easy to drill these holes accurately.

DSC02421

To drill the holes in the large cylinder I went back to the jig I made to hold the part while I was making the knurling.

DSC02352

Here are the fully assembled parts. The ends of the side dowels need to be angled so I did this using a small belt sander after they were assembled. This guaranteed that the angle was the same on both dowels on each part.

DSC02425

Sunday, February 24, 2019

Under Shoulder Detail Part 2

The part of the shoulder detail is the smaller cylinder. Due to it’s size I decided to make more then one at a time.I started with a dowel of the correct finished diameter and marked of where the cuts need to be made for each part.

DSC02341

I mounted this in the lathe and marked the lines all the way around.

DSC02342

I used the lathe to cut the low areas on the end of each part. The raised area will become knurling.

DSC02343

Once the lathe work was done I cut the pieces to their finished length.

DSC02344

To make the knurling I used the same technique as the large cylinder. I drilled a hole through the part so I could mount it on this jig to make the grooves.

DSC02346

Here is the part with the knurling complete.

DSC02347

Sunday, February 10, 2019

Under Shoulder Details Part 1

The next part I am going to show is the under shoulder detail.

ILM R2 P1010009


To make the main part I started by cutting a dowel into pieces of the correct length.

DSC02348


To create the knurling on the part I started by making a paper template with lines for where each groove will be. I wrapped this template around the part and glued it on using spray adhesive.

DSC02349


To hold the part while I was working on it I took a block of wood and drilled a hole in it the same size as the dowel, then I cut the end of the block in half exposing the button of the hold .

DSC02394


To make the grooves I started with an X-Acto knife and the opened up the cuts some more with a needle file.

DSC02350


These parts have a groove around them on either end. To make this I went back to my mini-lathe.  I wrapped electrical tape around the end of the part to prevent the jaws from damaging the part.

DSC02351


Finally I drilled the holes that will hold the side dowels. I went back to my jig to hold the part and drilled in on the drill press.

DSC02352

Saturday, June 2, 2018

Leg Strut Part 3

The final detail on the leg struct is the disk on the block at the top. I cut this out of a dowel and glued a small washer to the bottom to create the space between the disk and the block.

DSC02293

Here are all the parts prior to assembly.

DSC02294

To assemble it I started with everything but the top block so that I could clamp the whole assembly while the glue dried.

DSC02297


Here is the final part before paint.

DSC02338

Sunday, March 25, 2018

Leg Strut Part 2

In my last post I showed how I build section 3 and 4 of the leg strut, in this post I will show section 1 and 2.

LegStruct

I started out with a piece of 2x2 stock, cut down the width and height on the table saw and finally cut it to length. The circle on the finished piece is to indicate which face will eventually get the disk.

DSC02283 DSC02284

DSC02286

Next I need to drill a hole for the dowel shown in section 2. Here I have marked the location where the hole will go.

DSC02287

Since this has to be drilled and an angle I made up this jig to hold the piece while I drill it. I made the hole with a forstner bit.

DSC02289

Here is the block with the dowel. Not shown here, but I also drilled a small hole in the end of the dowel for a smaller dowel which will attach it to the rest of the assembly.

DSC02292

To make section 2 I decided to use a stack of alternating sized washers. I started by making a jig with is simply a small dowel in a piece of scrap. I then put down the first large washer, and then glued on a small one using super glue.,

DSC02295

I then repeated this process with two more large and two more small washers. I put on a stack of washers (not glued) to make up the rest of the height if the dowel and then clamped the whole thing until the glue dried.

DSC02296

Saturday, March 3, 2018

Leg Strut Part 1

The next piece to work on is the leg strut. This is a much more complex part then the shoulder hydraulic I showed in the last couple posts, so I broke it down into 5 section as seen in the diagram. I will start with section 4.

LegStruct

For this piece I went back to the machine lathe. I started with a dowel that matches the largest diameter of the part. Using the measurements in the plans I marked out each segment.

DSC02267

I then machined each of the grooves in the part.

DSC02268


DSC02269

Here is the part with the lathe work complete. I still needs to be trimmed to length and cleaned up a bit.

DSC02271

Using a centering gauge I marked the center of each end.

DSC02280

I then drilled out each end for dowels that will be used to connect the sections together.

DSC02281


For piece 3, I cut the part from a dowel of the correct diameter and then used a file and some sanding to create the bevel on the edges.

DSC02270

I marked the center of the piece with the centering gauge and then mounted it in my dowel drill jig to drill a hole through the center.

DSC02273

Here are the two pieced complete.

DSC02278