Sunday, February 24, 2019

Under Shoulder Detail Part 2

The part of the shoulder detail is the smaller cylinder. Due to it’s size I decided to make more then one at a time.I started with a dowel of the correct finished diameter and marked of where the cuts need to be made for each part.

DSC02341

I mounted this in the lathe and marked the lines all the way around.

DSC02342

I used the lathe to cut the low areas on the end of each part. The raised area will become knurling.

DSC02343

Once the lathe work was done I cut the pieces to their finished length.

DSC02344

To make the knurling I used the same technique as the large cylinder. I drilled a hole through the part so I could mount it on this jig to make the grooves.

DSC02346

Here is the part with the knurling complete.

DSC02347

Sunday, February 10, 2019

Under Shoulder Details Part 1

The next part I am going to show is the under shoulder detail.

ILM R2 P1010009


To make the main part I started by cutting a dowel into pieces of the correct length.

DSC02348


To create the knurling on the part I started by making a paper template with lines for where each groove will be. I wrapped this template around the part and glued it on using spray adhesive.

DSC02349


To hold the part while I was working on it I took a block of wood and drilled a hole in it the same size as the dowel, then I cut the end of the block in half exposing the button of the hold .

DSC02394


To make the grooves I started with an X-Acto knife and the opened up the cuts some more with a needle file.

DSC02350


These parts have a groove around them on either end. To make this I went back to my mini-lathe.  I wrapped electrical tape around the end of the part to prevent the jaws from damaging the part.

DSC02351


Finally I drilled the holes that will hold the side dowels. I went back to my jig to hold the part and drilled in on the drill press.

DSC02352

Sunday, February 3, 2019

Foot Half Moon Details

On the side of the feet is the half moon foot detail. 


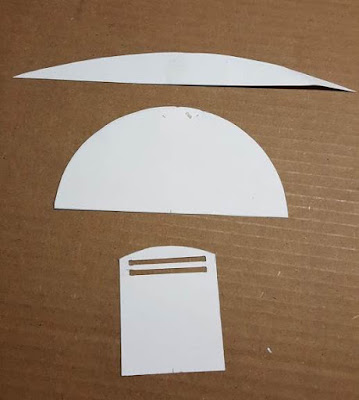
 I started by cutting paper templates from the styrene plans. The middle element has some smaller pieces that I didn't do templates for but just hand cut. I used these templates to cut the styrene parts.


To make the half moon I wrapped the outer part around the half circle element and glued it in place. You need to be sure you have it carefully aligned so that both ends end up in the correct location. Next I cut and glued in the triangular ribs to strengthen the part. 


The middle element is made of three parts. The front part with the two slots at the top, two thin triangles that form the sides and finally a small strip to close up the bottom. I glues up these parts and sanded them smooth and the glues the finish assembly to the half moon.


Since the side of the foot was skinned in styrene I could use styrene cement to glue on the detail. I used a couple clamps to hold it in place to dry. In this picture you can also see the three other details on the side of the foot. These were cut from styrene using templates made from the plans and glued in place with styrene cement.