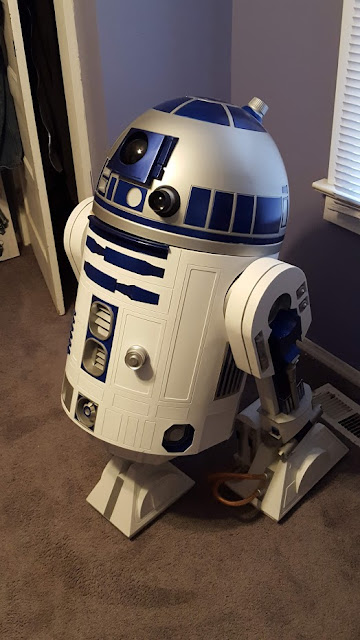
Wednesday, December 30, 2020

Utility Arms

Like a lot of my build I decided to make the utility arms from scratch out of wood and was reasonably happy with the results, although in hindsight I would probably have been better off buying resin versions of these, or getting them 3D printed.

I started by making a paper template from the blueprints. I glued this to a thin piece of wood that I will use in a later step.


I rough cut the template on the bandsaw and then used various sanding tools for clean it up.


I glued up two pieces of MDF to make a wood blank of the right thickness.


I glued another copy of the paper template to the wood blank and rough cut the shape on the bandsaw.


I screwed the wood template to this piece and then used my router table with a pattern cutting bit to cut the final shape of the curved parts. The one screw hole will be where the pivot point will go, but the other I will fill with wood filler.


The router can’t get into all the tight spots so I had to do some hand sanding and filing to clean up those spots.


With that profile complete I created another paper template and used it do draw on the other profile.


Once again I rough cut this profile on the band saw and the did filing and sanding to clean it up.


Here is the final product with a couple coats of primer.


Saturday, December 26, 2020

Progress Photos

As I have mentioned in previous posts this blog is way behind my actual progress. Here are some progress pictures take throughout the years.

This is from January of 2016 when I did a test fit of the various assemblies.


Here is a picture from December 2018. The biggest different you will notice is that he is no longer a R5-D4. Once I had the body together and started to test fit the skins, I was so happy with the way it looked that I decided that there was not way I couldn’t do an R2-D2.


Finally, here are some picture from April 2019 just before his first public appearance at my companies May the 4th celebration. At this point it is just a static figure, but I have started to work on the dome lights and plan to do some other mechanical editions to it.


Wednesday, December 23, 2020

Read Door Frame

On the back of the frame I created a removable panel that allows access to the interior of the body.

Here is a pictures of the back of the frame where the door will go. I have seen two approaches to the power coupling that is at the bottom of the back. I have seen some people attach the power coupling to the frame and build the door around it. I decided to integrate the power coupling into the door.


Here are the frame components. I cut these using the same techniques as the rest of the frame which you can find in my earlier posts.


I wanted to be sure the door had a good fit to the frame so I first fit the uprights and clamped them in place.


I dry fit the top part of the frame and used some folded up paper to get proper clearance between the door and the body frame.


Hear I am fitting the lower rail into the frame.


Here are the rest of the components fit and temporarily clamped. I used folded pieces of paper again on the bottom to establish the proper clearance.


Once I was comfortable with the fit I took everything apart, glued it up and used a pneumatic staple gun to secure the parts.

Friday, July 17, 2020

Frame Assembly


Doing the final assembly of the frame is one of the tricky parts of building an R2. There are a lot of pieces that all have to go together at once because once the frame dries you will not be able to get certain pieces in unless you install them from the start. Here are some tips for assembling the frame:

- Dry fit everything first and make sure the fit is good.

- Be sure the outside edges of all the parts are flush with each other.

- Be sure all the parts are in the right place. I actually had two pieces in the wrong place. Fortunately I had posted a picture of it on the astromech.net message board before I glued it up and someone spotted it.

- Mark the points where pieces connect together with numbers or letters so you know how they go back together.

- Practice doing the assembly a few times before you commit to gluing it.

There are also some good videos on the process:

https://www.youtube.com/watch?v=LcgW66o0N9s&t=375s

https://www.youtube.com/watch?v=f-ZOh2rBuAY

Saturday, April 18, 2020

Skirt Part 4


The next step on the skirt where the strip details that go on the curved sides. I started by cutting a piece of wood to the correct width and thickness. Once I figured out the angles on each end I marked up the raw stock leaving enough room in between the pieces to make the cuts.


I made the rough cuts with a saw and then cleaned them up on my mini belt sander.


Here are the finished pieces.


I attached them with Gorilla glue and a small brad nails at either end. The ends of the pieces are going to be prone to splitting so I pre-drilled for the nails. A good trick is to actually put one of the nails into you drill and use that to make the pilot holes. The Gorilla glue expands as it dries so you can see a lot squeezing out between the parts.


Here are all the pieces attached and the glue cleaned up.I also needed to sand the end of each piece flush with the bottom of the skirt.


Finally I used hobby putty to fill in the gaps between the styrene and wood and to fill the nail holes.


Here is the finished product after sanding and painting.


Wednesday, April 8, 2020

Skirt Part 3

The hardest part of the skirt was the curved section in the front and back. I believe I found drawings of these parts that I used to make a poster board template. I used the template to make sure it had the correct fit. Once the fit was correct I cut the parts out of styrene.


I used glue and a pneumatic stapler to attach one end of the styrene to the mounting strip that I had attached to the wood side. The strip allowed the styrene to be mounted flush with the wood on the side.


I played around with a lot of different adhesives while building my droid and I found the the white Gorilla Glue worked really good for attaching styrene to wood. 


I wrapped the piece around and used some small brad nails to attach it to the block on the other side as well as the middle blocks.


Sunday, April 5, 2020

Skirt Part 2

I unfortunately didn’t take any good pictures of the next part of the skirt assembly, but here is one that show a good part of it.


The first thing I built was the plywood frame that goes around the area where the center foot goes. Normally I would cut the ends of the pieces on a 45 degree angle to join them together, but there isn’t enough room at the corners for that to fit, the corners of the box would actually stick out beyond the edge of the bottom plate. I probably could have still done this, and just cut the corners off, but what I ended up doing was still cutting the corners at 45, but attached them in reverse to that the corners did not stick out.

For the flat sides of the skirt I started with two angled blocks on each site which will hold the side panels. You can see them in this picture. For the side panels I used pieces of luan plywood with the edges cut at an angle. At the end of each pieces of luan I attached a small piece of wood which will be used to hold the styrene for the curved ends. I also put angled wood blocks in the middle of the ends to help hold the styrene.

Here I have attached the skirt frame to the bottom of the body. I decided not to try to build the skit as an independent assembly, once it’s attached it won’t be coming off.

Sunday, March 29, 2020

Skirt Part One

The piece on the bottom of R2’s body that goes around the center leg is called the skirt. This turned out to be a pretty tricky part to make. I started by making the bottom plate of the skirt from 3/4” Plywood. Here you can see the layout:


The flat side of the plate was cut on the table saw.


The rounded ends were made using the same technique I used to make the body plates. I rough cut them on the bandsaw and them cleaned up the cut using my router table jig.


To cut out the inside, I started by drilling holes in the four corners.


I cut the long edges on the router table, putting the flat side up against the fence and cut the other sides free hand using a jig saw.