Monday, January 24, 2022

Dome Bearing

One of the first pieces of animation that I added to R2 was dome rotation. When I initially built him I just put a cheap lazy susan I had on hand between the dome and the body. This did it's job but really wasn't suitable when putting a drive motor on the dome. 

The preferred lazy susan for droid building is a 18" one like this from Granite Earth.

https://www.graniteearth.com/ProductDetails.asp?ProductCode=PAY-Lazy-Susan-R2-Builder

This lazy susan may me ok right out the box but some people take some extra steps to make it smoother and quieter. The first thing to do it take it apart, and clean and polish it. There is a screw in the side of the bearing that can be removed to dump out the balls. Be sure to mark the initial position of this screw since it needs to be put back together the same way so that it lines up properly with the inside of the track. With the bearing disassembled you can clean and polish the track the balls run in, and also clean the balls. It can then be lubricated with some silicon spray and re-assembled. Here is a good video that shows the process.


As a further step to make it run quieter, you can replace the metal balls with Delrin Acetal Resin ones, for example McMaster-Carr as part number 9614K57.


Saturday, December 4, 2021

Rear Logic Display


The rear logic display is put together the same way as the front logic dispalys. There is a PCB, bezel, and a clear plastic cover. I once again used spacers between the PCB and bezel.


Here is the logic display mounted in the dome.


Sunday, November 21, 2021

Front Logic Displays


The logic displays are composed of three parts, the PCB, a bevel that goes around the LEDs and a clear plastic window.


To attach the parts to the resin part I used pieces of threaded rod (actually cut off screws) that I glued into the resin part. 


Here is the resin part marked up for the holes. I carefully drilled these on the drill press. 


I used two-part epoxy to glue in the screws. To keep them aligned while drying I put them through a piece of wood with the same holes drilled in it and then put the PCB on top to assure the alignment was correct. 


I needed some spacers between the bezel and the PCB, but couldn't easily find something the correct size. Instead a got a styrene tube and cut off pieces of the appropriate length to make the spacers.


Saturday, September 11, 2021

PSI

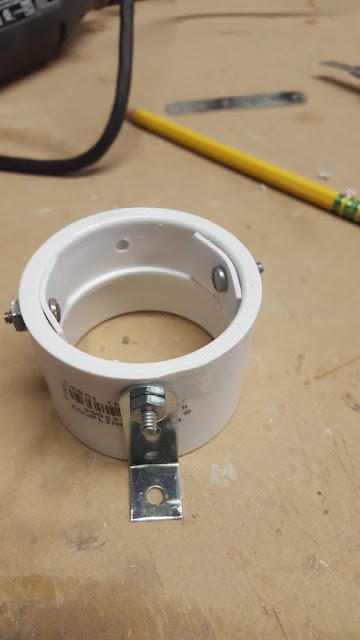
To mount the Processor Status Indicators (PSI) I used a standard PVC pipe coupling. The PCB fits perfectly in these and they have a ridge in the center that will hold the board in a good spot. Also pictures here is the dome panel that goes in front of the PSI. Not shown is a frosted disk that goes on the front. I cut that disk out of a piece of white plexiglass and glued it to the coupling. The edges will not be seen so the cut doesn't need to be very clean. 


My initial way of holding in the PCB was to cut two small rectangles of thin styrene, drill holes through these and the pipe fitting and then bolt them on. 


Some time later I got a 3D printer and used that to print a retaining ring. You can download the STL and original FreeCAD file from here: https://www.thingiverse.com/thing:4948450


To attach the PSI to the dome I used these metal plates I found at my local home improvement store. 


I cut these to length, and bent them to make a L-bracket. I bolted this to the pipe fitting and attached it to the dome with the bolts I built into the dome when I assembled it. 


Friday, September 3, 2021

Dome Lights Part 1

The first electronic elements I added to R2 were the dome lights. I got an early start on these since I needed to figure out how I was going to mount them in the dome. 

There were initially five lighting elements I worked on. On the front are the two rectangular Front Logic Displays and the round Front Processor Status Indicator.


On the back if the rectangular Read Logic Display and another round Processor Status Indicator.


For the lights I used the Teeces dome light system. Here are two good links that describe this system:


On the Astromech.net message boards you can usually find people selling pre-assembled units, our you can buy the parts and assemble them yourself which is what I did. I will cover that more in future posts. 

The blank PCB's can be bought here:


I also purchased the bezels from this parts run:


These were the key components I needed to determine how I was going to mount them in the dome.


Sunday, July 25, 2021

Painting Part 2


A lot of the parts on R2 are a single color, but there are some that need two colors. One example is the angle cylinder. To paint this I started with a primer coat of white. I then roughly masked off the area that will be blue and then sprayed the silver parts. With the silver dry, I carefully masked off the silver, and then sprayed the blue.


I followed a similar process for the ankle details. These need the tab on the end to be blue and also the recessed rectangle. This required some careful masking.


The horseshoes need the inside edge painted silver, so this also required some careful masking.


The power coupling were the hardest part to paint. I started with white primer and then the silver, but it would have been really hard to mask off for the blue. I ended up painting the blue by hand. I sprayed a little of the paint into a plastic cup and then painted it on with a brush. 


Saturday, July 17, 2021

Painting

 To paint R2, I used off the shelf cans of spray paint. 

For the white parts, and as a primer for all the other parts I used Rust-oleum Ultracover Paint+Primer Flat White.


For the silver parts I use Dupli-Color Chrome High Gloss. 


The trickiest color is the blue since it's hard to get a good sense of what the correct color is due to different paint jobs and lighting conditions in the movies. I ended up going with Dupli-Color Sonic Blue Pearl.


The Dupli-Color paints are automotive paint and can be found in auto-parts stores. The tricky part with these is that they are very sensitive to humidity. If it's to humid you will get cracking as the paint dries. I ended up doing most of the painting with these during the winter when the humidity was lower.